






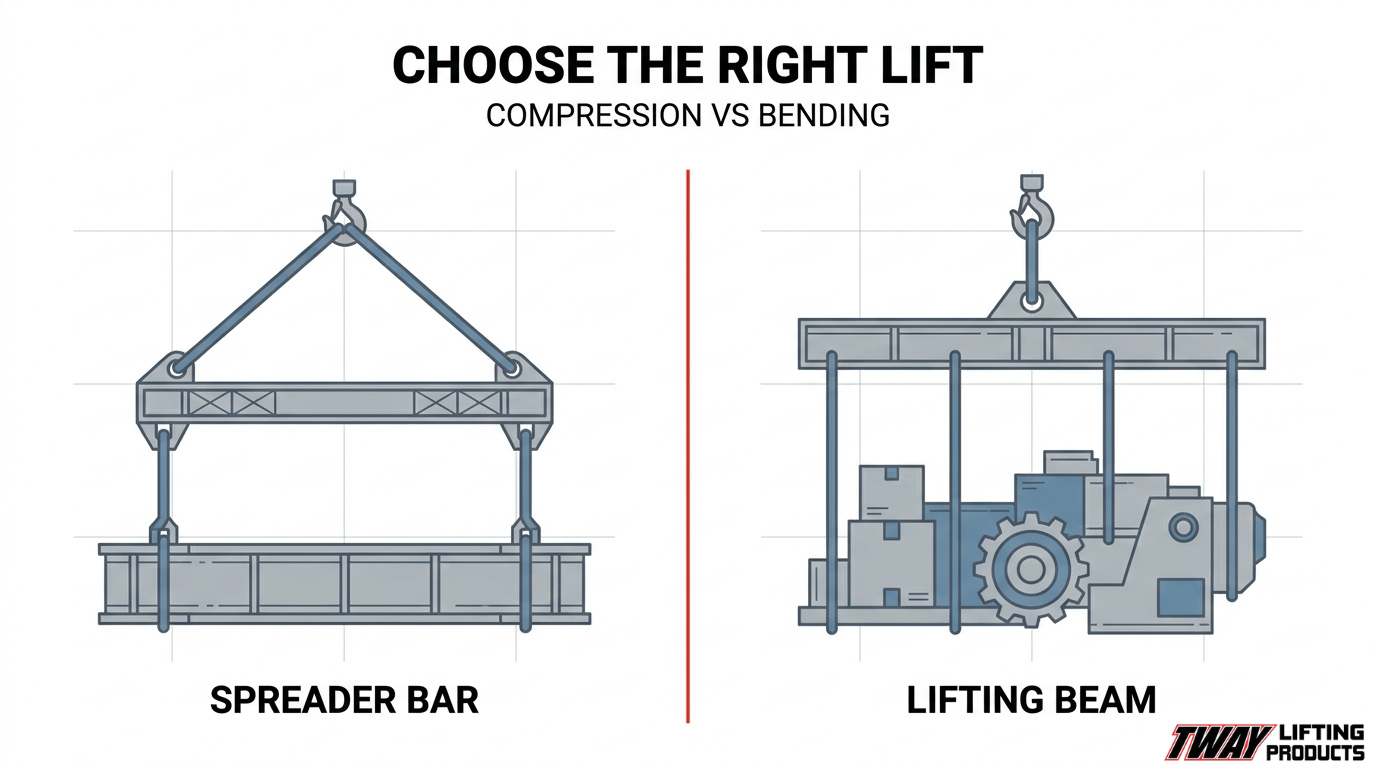

A spreader bar is a below-the-hook lifting device that carries force in compression to keep slings vertical, while a lifting beam hangs from a single bail and carries force in bending. Choosing the right device depends on load geometry, weight distribution, available headroom, and pick-point layout.
This guide covers how each device works structurally, the conditions that favor one over the other, sizing and compliance requirements, common selection mistakes, and whether renting or buying makes more sense for your operation.
Spreader bars and lifting beams differ in how they distribute force. A spreader bar absorbs horizontal compression along its length so lower slings stay vertical, which protects wide, flexible, or thin-walled loads from crushing. A lifting beam resists bending through its web and flanges, letting riggers offset the top bail over an uneven center of gravity.
Load behavior determines which device fits. Spreader bars suit wide or flexible loads, reduce sling stress on long spans, and save headroom when rigged with a top bail instead of a tall bridle. Lifting beams earn their place on off-center picks, asymmetric weight distribution, and loads requiring three or more attachment points along a single axis.
Sizing depends on the working load limit at the actual span, not just total capacity. Crane hook height and sling angle geometry must be confirmed before committing to either device. OSHA and ASME BTH-1 standards govern design, inspection intervals, and documentation for both.
We also break down the rent-versus-buy decision based on lift frequency, load variability, and storage capacity, plus how consolidating rentals and inspections under one rigging partner keeps equipment compliant and lifts on schedule.
What Is a Spreader Bar and How Does It Work?
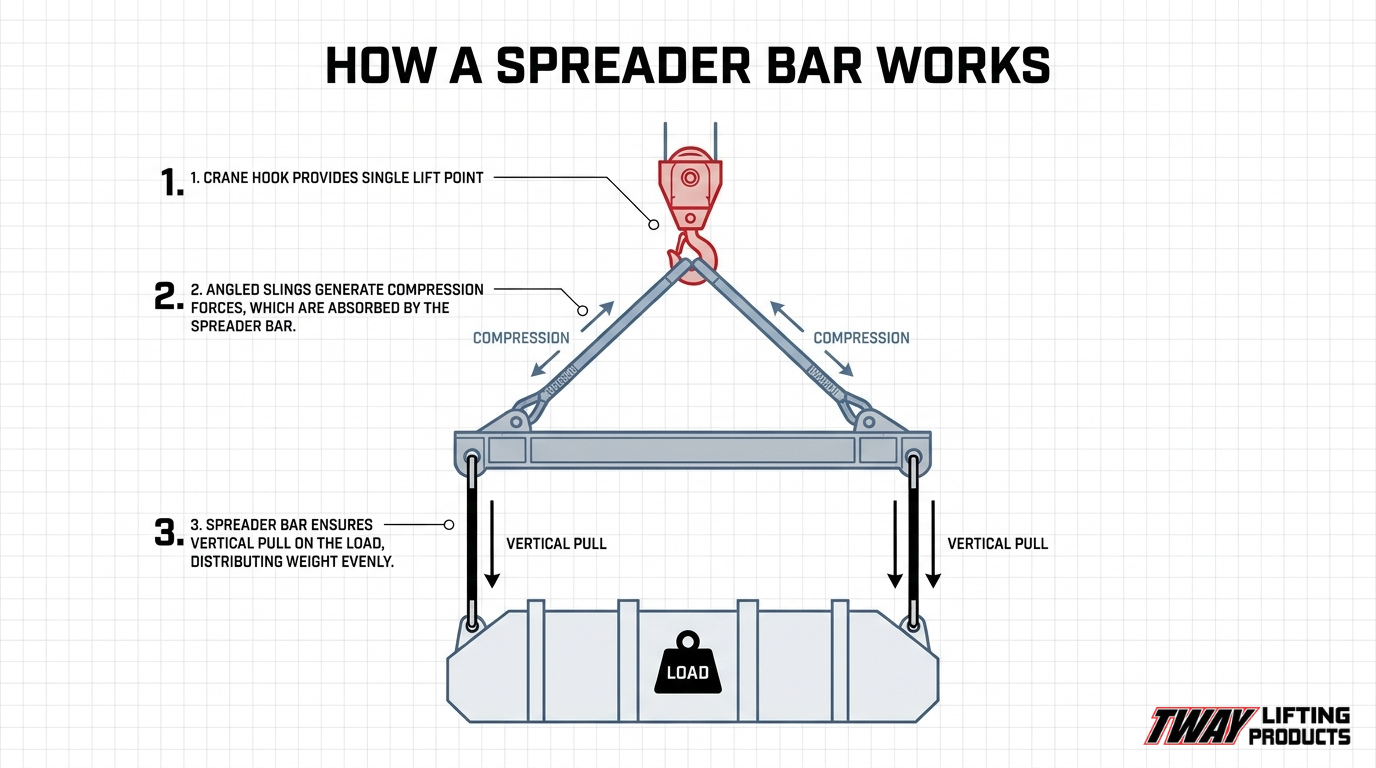
A spreader bar is a below-the-hook lifting device that separates two or more lifting points so the slings running to the load stay vertical. A spreader bar works by converting the inward pull of angled slings into compressive force carried along the length of the bar itself.
The lift path through a spreader bar follows three stages:
- Two top slings run from the crane hook down to each end of the bar, forming a bridle.
- The bar absorbs the horizontal compression generated by those angled legs.
- Vertical bottom slings or shackles connect each bar end to the load’s pick points.
That geometry matters most on long, flexible loads, where crushing force, not total weight, causes the damage. Lifting beams handle that force differently.
What Is a Lifting Beam and How Does It Work?
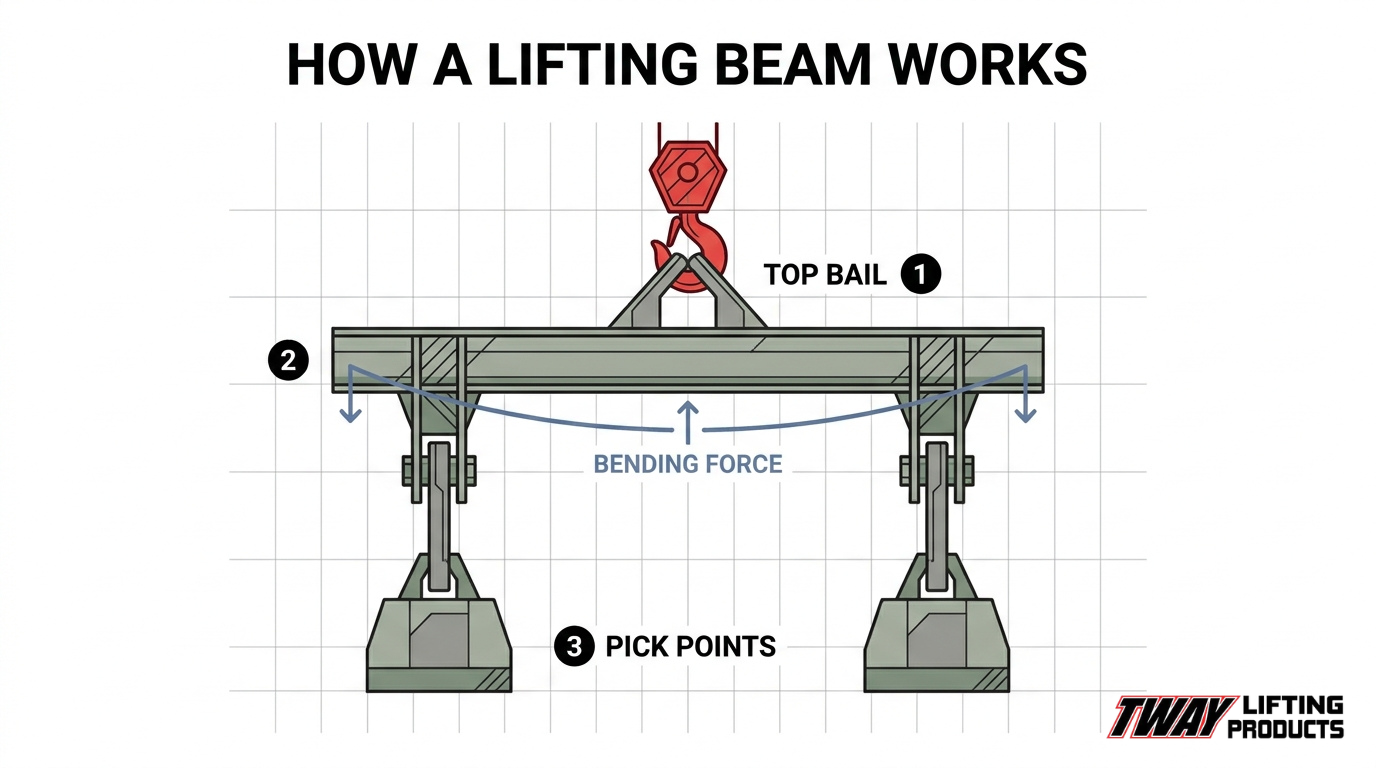
A lifting beam is a below-the-hook lifting device that hangs from a single top attachment point and carries the load through bending along its length. Unlike a spreader bar, the beam resists bending stress rather than compression.
A lifting beam works through three components:
- A top bail or lug that connects to the crane hook.
- A structural beam, typically an I-beam or fabricated box section, that transfers the load.
- Lower pick points, usually lugs or holes, where slings, shackles, or hooks attach.
In practice, lifting beams earn their keep on off-center picks, since one hook point lets riggers move the attachment rather than rebalance the load. That structural contrast drives the design differences covered next.
What Is the Structural Difference Between the Two?
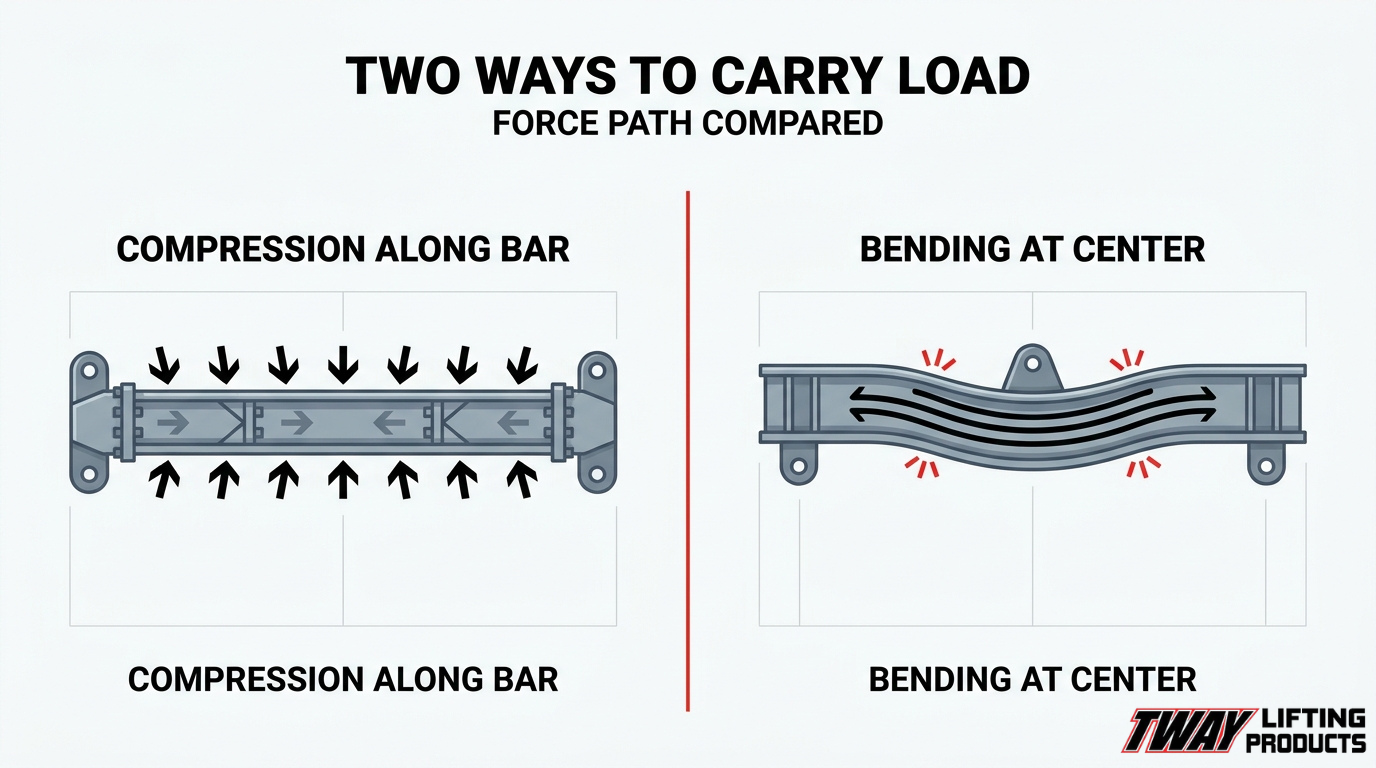
The structural difference is how each device carries force: a spreader bar works in compression, while a lifting beam works in bending. The sections below explain how load distribution differs between the two designs and how sling angles affect each below-the-hook device.
How Does Load Distribution Differ in Each Design?
Load distribution differs because a spreader bar transfers force axially while a lifting beam transfers force through its center. The spreader bar pushes outward along its length as the top slings pull inward, so the bar itself stays in compression. A lifting beam hangs from a single central bail, which forces the beam to resist bending between that pick point and the lower lugs.
- Spreader bar: compression along the bar axis, with sling tension handled by the upper rigging.
- Lifting beam: bending and shear through the beam web and flanges, concentrated near the center lift point.
That difference explains why spreader bars stay relatively light at long spans, while lifting beams gain weight quickly as span increases.
How Do Sling Angles Affect Each Below-the-Hook Device?
Sling angles affect each below-the-hook device differently because only the spreader bar depends on angled slings to function. Upper slings on a spreader bar converge toward the crane hook, and as that angle flattens, tension in each leg rises and compression in the bar increases. Lower slings run vertically to the load, keeping sling stress off the attachment points.
A lifting beam removes the top sling angle entirely. The crane hook connects to one central bail, and the load hangs from lugs on vertical legs, so leg tension stays close to the share of load each lug carries.
In practice, rigging crews underestimate how fast flat sling angles erode a spreader bar’s rated capacity. Correct geometry comes before device selection on every lift.
When Should You Choose a Spreader Bar Over a Lifting Beam?
Choose a spreader bar over a lifting beam when the load is wide, flexible, or sensitive to sling compression. The sections below cover three deciding conditions: wide or flexible loads, sling stress reduction, and lifts restricted by available headroom.
When Is a Spreader Bar Best for Wide or Flexible Loads?
A spreader bar is best for wide or flexible loads when the pick points sit far apart and the load cannot resist inward crushing force. The bar holds the slings apart in compression, so the lifting force at each pick point stays near vertical instead of pulling inward.
Typical loads that favor a spreader bar include:
- Long structural steel, pipe, and precast panels that need two widely spaced pick points.
- Flexible or thin-walled items such as tanks, ductwork, and crated glass that buckle under side loading.
- Machinery and skids where the manufacturer specifies vertical lifting at designated lugs.
In practice, span is the first thing to check. Once pick points exceed roughly half the load length, a lifting beam rarely matches a spreader bar for stability.
When Does a Spreader Bar Help Reduce Sling Stress?
A spreader bar helps reduce sling stress whenever a direct bridle hitch would force the slings into a shallow angle. As the sling angle to horizontal drops, tension in each leg climbs sharply, and a 30-degree hitch can carry roughly twice the tension of a vertical lift at the same load weight.
The spreader bar removes that penalty by converting the horizontal pull into compression in the bar. Lower slings run vertically, so sling tension approaches the actual share of the load weight.
This matters most with synthetic slings and long spans, where reduced tension also means smaller shackles, lighter slings, and less wear per lift cycle. Lower sling tension generally extends sling service life.
When Is a Spreader Bar Ideal for Limited Headroom?
A spreader bar is ideal for limited headroom when it is rigged with a top bail, master link, or short top slings rather than a long bridle. That configuration keeps the overall rigging height close to the bar depth plus hardware, instead of adding the vertical rise a wide bridle hitch requires.
Two headroom conditions favor a spreader bar:
- Wide loads that would otherwise need tall bridle legs to reach a safe sling angle.
- Lifts where a telescopic or adjustable-length bar can be set to the exact span, shortening the rigging stack.
If the design still requires steep top slings, a lifting beam becomes the shorter option. Understanding when that trade-off reverses points directly to the lifting beam’s strengths.
When Should You Choose a Lifting Beam Over a Spreader Bar?
You should choose a lifting beam over a spreader bar when the load’s balance point, attachment layout, or weight distribution requires a rigid device with vertical slings. The sections below cover three deciding conditions: uneven or off-center loads, multiple pick points, and asymmetric weight distribution.
When Is a Lifting Beam Best for Uneven or Off-Center Loads?
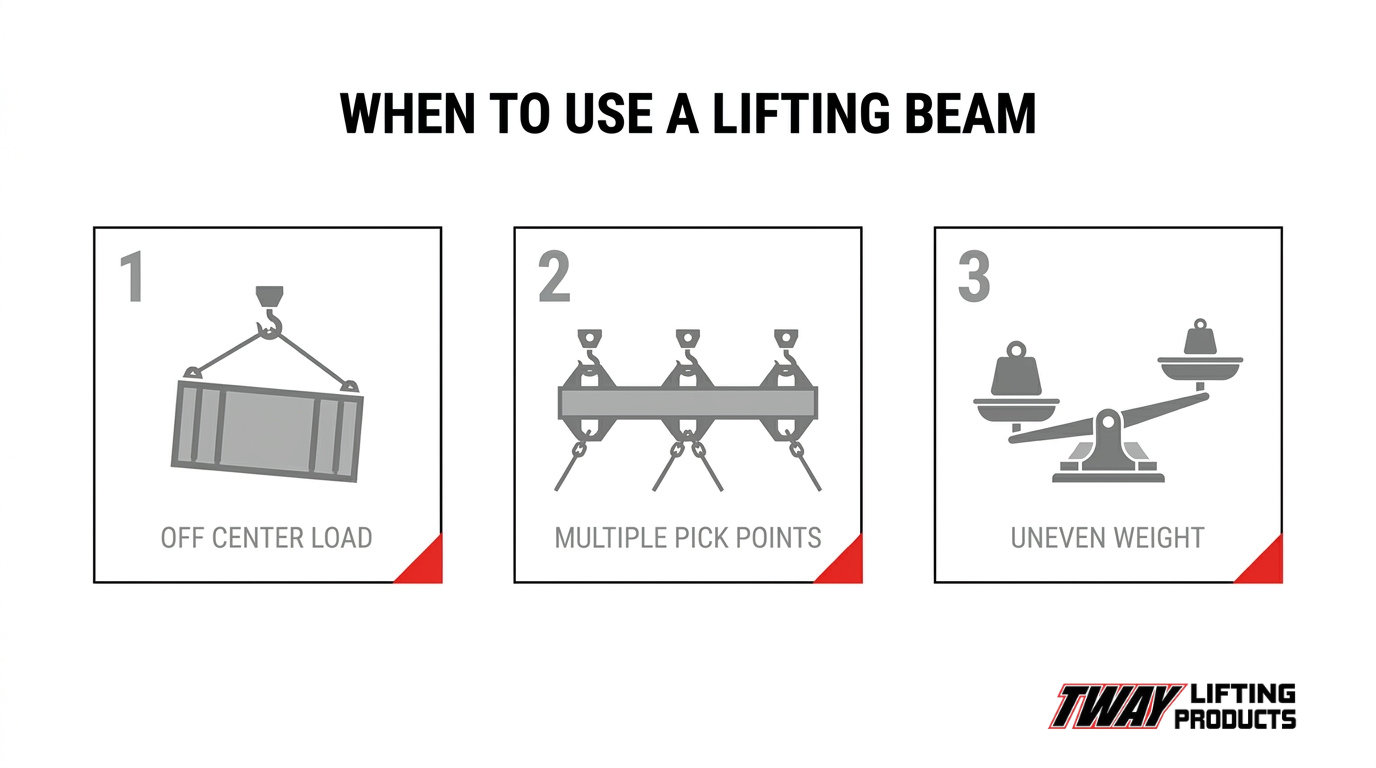
A lifting beam is best for uneven or off-center loads when the center of gravity sits away from the geometric middle of the load. The beam carries the load in bending rather than compression, so the top bail can be repositioned over the true balance point without re-rigging the slings underneath.
Conditions that favor a lifting beam include:
- The center of gravity is known but offset toward one end.
- The load must hang level despite unequal end weights.
- Vertical sling legs are required to avoid side loading on lugs or padeyes.
- Attachment points cannot be moved on the load itself.
In practice, an adjustable or multi-hole top bail is the feature that makes this work. Riggers shift the hook point, trial-lift, and confirm the load hangs level before committing to the full lift. For operations facing variable load geometries, rental fleets that include telescopic adjustable-length bars can provide the flexibility to match exact pick-point spacing without maintaining a large inventory of fixed-length beams.
When Does a Lifting Beam Work Better for Multiple Pick Points?
A lifting beam works better for multiple pick points when a load needs support at three or more locations along a single axis. Lower attachment holes spaced along the beam’s length allow each pick point to carry a designed share of the load.
Typical applications include:
- Long pipe, structural steel, or truss sections that would sag with only two picks.
- Machinery frames with fixed lifting lugs at irregular spacing.
- Fabricated assemblies where deflection between supports must be limited.
Because each lower lug introduces its own bending moment, the beam must be rated for the specific pick-point configuration being used, not just the total load weight. Never add pick points to a beam that was designed and tagged for fewer.
When Is a Lifting Beam Needed for Asymmetric Weight Distribution?
A lifting beam is needed for asymmetric weight distribution when one end of the load weighs significantly more than the other and the sling legs must remain vertical. The beam resists the resulting unbalanced moment internally, so the crane hook stays centered while each leg takes an unequal share.
Spreader bars cannot manage this condition the same way, since their angled slings redistribute tension as the load shifts and can overload one leg. With a lifting beam, the rigger calculates the load at each lower lug, verifies no single lug exceeds its rating, and sets the top bail accordingly. This calculation is where most asymmetric lifts go wrong, and it deserves more attention than total weight alone. Once the correct device is selected, sizing the beam or bar to the lift becomes the next decision.
What Are Common Mistakes When Selecting Between the Two?
The common mistakes when selecting between a spreader bar and a lifting beam are choosing by availability instead of load behavior, and misjudging how each device carries force. The most frequent errors include:
- Using a lifting beam on wide loads, which adds heavy bending stress.
- Forgetting hook height, so a spreader bar’s sling angles exceed available headroom.
- Trusting rated capacity without checking the working load limit at the actual span.
- Attaching slings at unrated points instead of the designed pick points.
- Skipping tag verification and inspection before the lift.
Span and headroom decide the right device more often than capacity does, yet both get checked last on most job sites. With these selection errors addressed, the next question is whether to rent or buy.
Should You Buy or Rent a Spreader Bar or Lifting Beam?
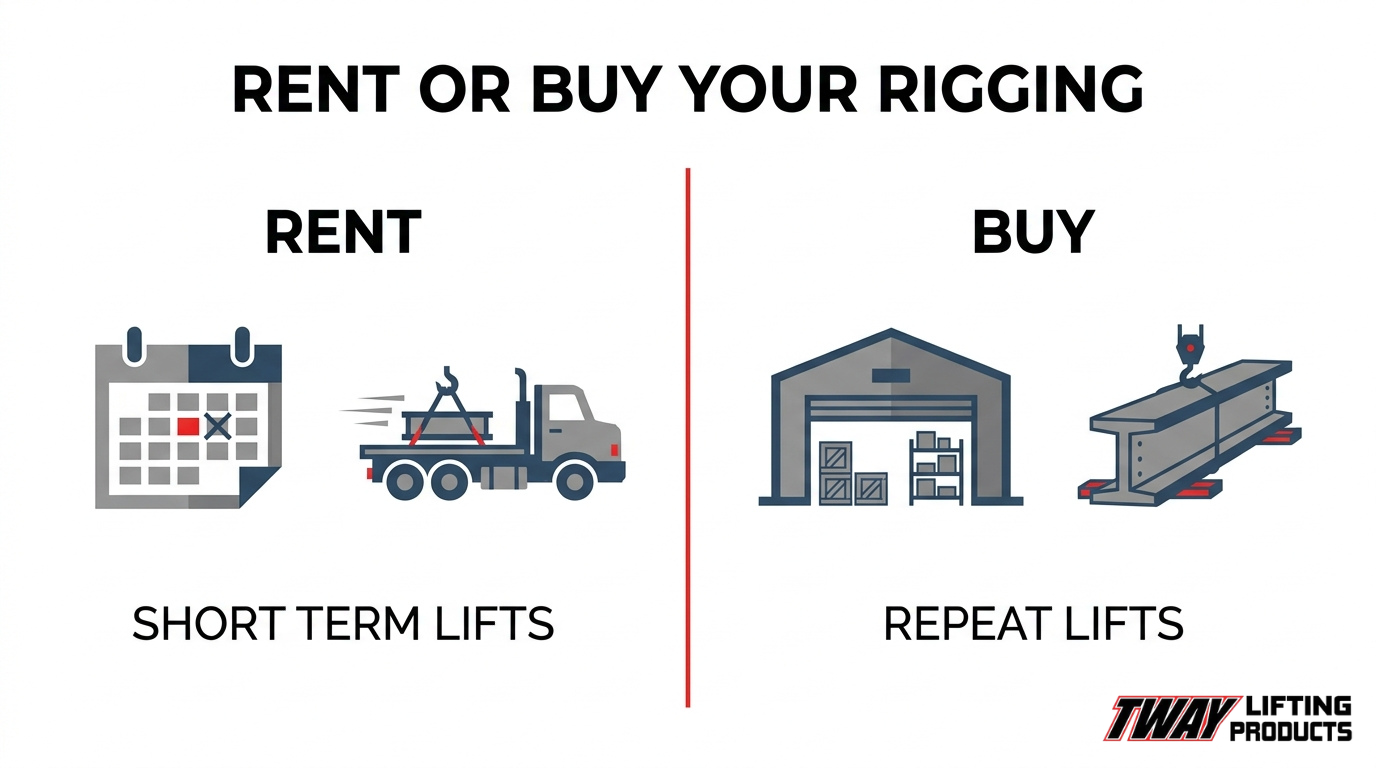
The decision depends on lift frequency, load variability, and storage capacity. Renting fits occasional, one-off, or oversized lifts, while purchasing suits repeat lifts with consistent dimensions. The sections below break down the factors that favor each option.
What Factors Determine Whether Renting Makes More Sense?
Renting makes more sense when the lift is infrequent, the load dimensions change between jobs, or the required capacity exceeds the equipment you already own. Rental also removes the burden of storage, recertification tracking, and repair costs from your operation.
Renting is typically the stronger choice when:
- The project is a one-time or short-duration lift.
- Load width or pick-point spacing varies from job to job.
- The lift requires a higher capacity than your owned inventory covers.
- Yard or warehouse storage space is limited.
- Crews need an adjustable-length bar for a single, specific span.
In practice, most contractors overestimate how often a specialty spreader bar will be reused. Renting keeps capital free and shifts inspection responsibility to the supplier.
What Factors Make Purchasing the Better Long-Term Choice?
Purchasing becomes the better long-term choice when the same lift repeats on a predictable schedule with consistent load geometry and capacity requirements. At that point, cumulative rental fees exceed the cost of ownership, and immediate on-site availability becomes an operational advantage.
Ownership generally pays off under these conditions:
- The device is used weekly or monthly across ongoing production work.
- Load dimensions and weights stay consistent between lifts.
- The application needs a custom-fabricated beam or bar no rental fleet carries.
- Lifts occur on short notice, making delivery lead times unworkable.
- Secure indoor storage and an in-house inspection program already exist.
Owners must still budget for annual inspections, documentation, and repairs. Operations that handle both owned and rented equipment can simplify compliance tracking by consolidating inspection services with their rigging supplier, ensuring consistent documentation and reducing administrative overhead across the entire fleet. With the buy-versus-rent decision settled, the right rigging partner keeps both paths compliant.
How Does Having One Rigging Partner for Rentals and Inspections Simplify Your Lifts?
Having one rigging partner for rentals and inspections simplifies your lifts by consolidating equipment sourcing, documentation, and compliance under a single point of contact. The sections below cover what Tway Lifting’s spreader beam rental fleet and inspection program include, plus the key takeaways for choosing between spreader bars and lifting beams.
What Does Tway Lifting’s Spreader Beam Rental Fleet and Inspection Program Include?
Tway Lifting’s spreader beam rental fleet and inspection program include below-the-hook rental equipment, OSHA-required annual inspections, and repair services performed by certified, factory-trained qualified riggers. Rental and inspection offerings cover:
- Spreader beams from 2 to 100 tons, up to 40 feet in length.
- Telescopic adjustable length bars for variable pick point spacing.
- Supporting rigging hardware, such as wire rope slings, synthetic slings, shackles, hoists, and load cells.
- Daily, weekly, or monthly rental terms with free local delivery and pickup.
- OSHA-required annual inspections and job site safety inspections with detailed reporting.
Pairing rentals with inspection service removes a common planning gap: equipment arrives on site already documented, so crews are not chasing paperwork the morning of a critical lift.
What Are the Key Takeaways About Spreader Bars vs Lifting Beams?
The key takeaways about spreader bars vs lifting beams come down to matching the device to the load’s geometry, weight distribution, and available headroom. Use these points when making the call:
- Choose a spreader bar for wide, long, or flexible loads that need sling stress reduced across multiple pick points.
- Choose a lifting beam for off-center, asymmetric, or uneven loads where the top connection must stay close to the hook.
- Confirm working load limit, span, and crane hook height before committing to either device.
- Verify inspection status and documentation before the lift, not after the crane is staged.
In practice, the most expensive mistakes come from sizing by habit rather than by measurement. Verify the numbers on every new load configuration.