





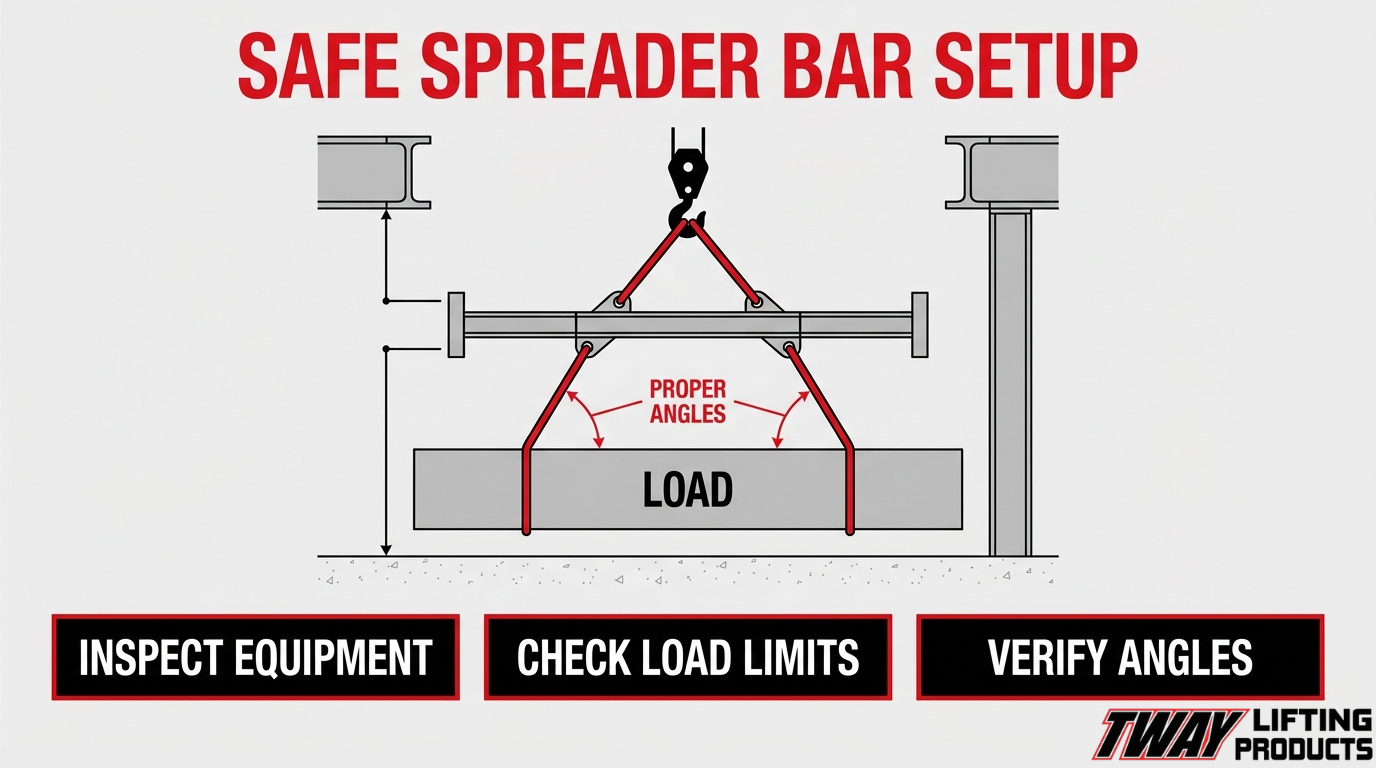

A spreader bar is a below-the-hook load attaching device that keeps lift slings separated and vertical, absorbing inward compression forces through the bar itself rather than transferring them into the suspended load. Setting one up safely on a rental unit requires more than connecting hardware — it demands verified equipment, precise geometry, and coordinated communication before any load leaves the ground.
This guide covers pre-use inspection of rented equipment, bar length selection and sling angle geometry, correct rigging and step-by-step setup procedures, the most common setup mistakes, applicable OSHA and ASME standards, and when to stop a lift and re-rig.
Inspecting a rented spreader bar means checking for visible structural damage, confirming working load limit markings match your lift plan, examining attachment points and hardware for wear, and verifying OSHA compliance documentation from the rental supplier.
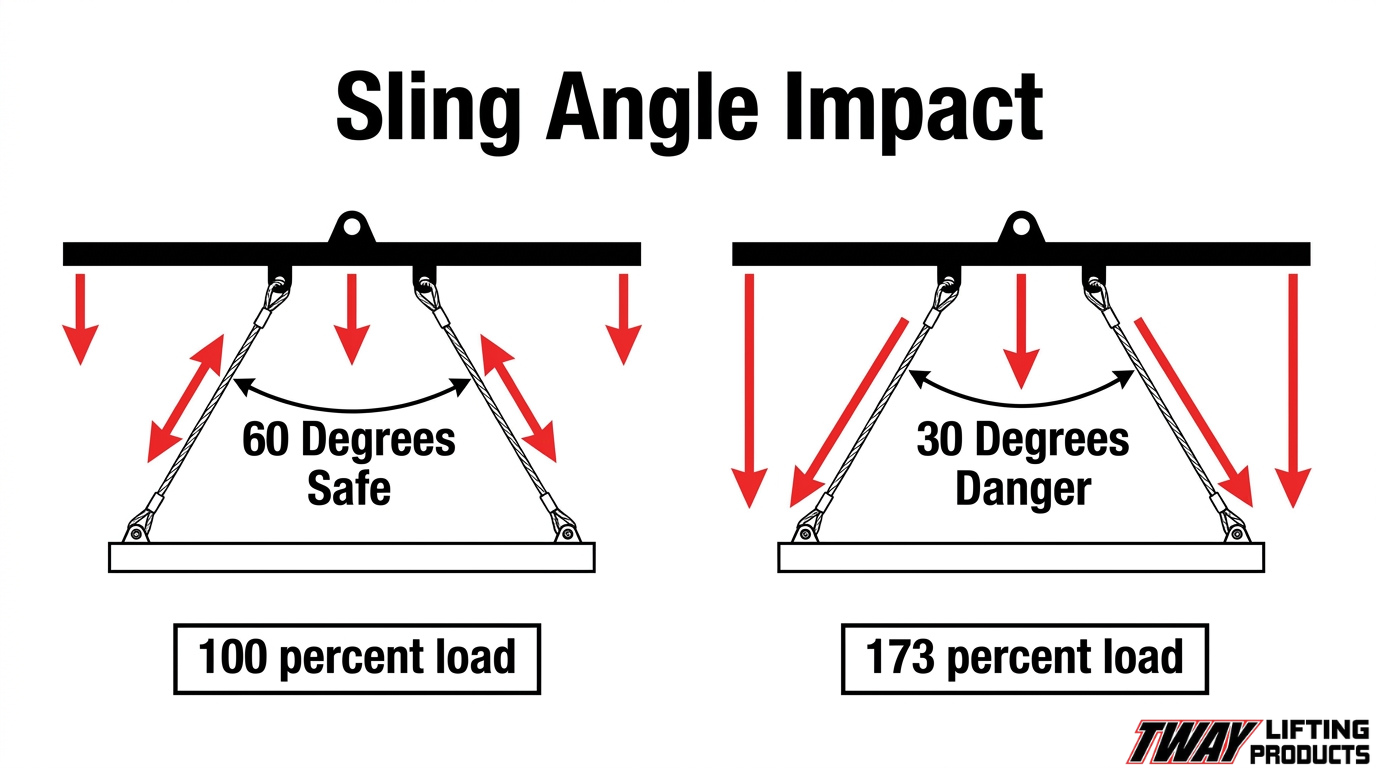
Calculating the right bar length requires understanding how sling angle directly affects tension: at 30 degrees, sling load is 1.732 times higher than at 60 degrees, which means bar length and headroom must be chosen together to keep slings at 60 degrees or above.
Rigging the bar correctly involves attaching slings without shock load, aligning the bar over the load’s center of gravity, and securing every shackle pin before a trial lift confirms the setup holds.
The most critical setup mistakes — steep sling angles, overloading beyond the marked WLL, and ignoring dynamic load ratings — each eliminate the engineered safety margin built into the bar’s design.
OSHA 29 CFR 1926.251 and ASME B30.20 govern marking, proof testing, and shift-by-shift inspection requirements that apply to rented equipment exactly as they do to owned equipment.
What Is a Spreader Bar and How Does It Work in Lifting?
A spreader bar is a below-the-hook load attaching device that keeps lift slings separated and vertical, preventing inward compression forces from damaging a suspended load. Understanding how it works mechanically is essential before rigging any lift.
How Does a Spreader Bar Function as a Compression Member?
A spreader bar functions as a compression member by absorbing the inward forces generated by angled top rigging. The top slings run from the crane hook and angle inward to each end of the bar, while the bottom slings hang vertically down to the load. This geometry pushes both ends of the bar inward, placing the bar itself under compression along its length rather than transferring those forces into the load. According to Holloway Houston Lifting, this mechanical action is what makes spreader bars effective for lifting loads that cannot tolerate sling-induced side pressure, such as pipe bundles, structural steel, or fragile fabrications.
What Is the Role of the Crane Hook and Bottom Rigging in a Spreader Bar System?
The crane hook connects to the top rigging, which spans outward to both ends of the bar. Bottom rigging hangs vertically from each end fitting down to the load’s attachment points. This two-tier arrangement transfers the full load weight upward through the bar to the crane hook while keeping vertical geometry below the bar. OSHA classifies a spreader bar as a load attaching device, and ASME B30.20 governs its marking, construction, and operation as a below-the-hook lifting device used to attach loads to a hoist.
What Should You Inspect on a Rented Spreader Bar Before Use?
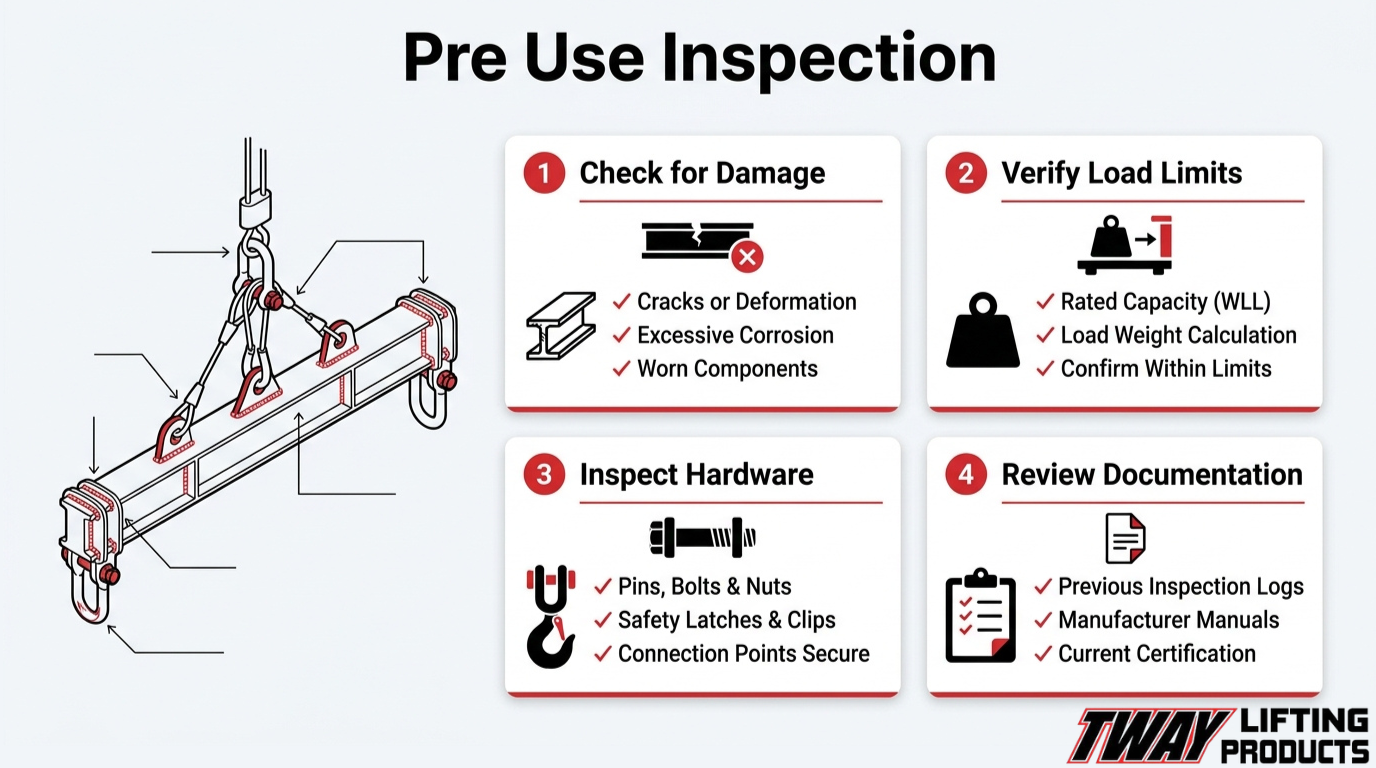
Inspecting a rented spreader bar before use covers four key areas: visible physical damage, working load limit markings, attachment points and hardware, and OSHA compliance documentation.
How Do You Check a Spreader Bar for Visible Damage?
Checking a spreader bar for visible damage means examining the entire bar for cracks, bends, corrosion, and weld failures before each shift. Pay close attention to the main structural tube or beam, as any deformation along its length indicates compromised compression capacity. Hardware contact points, such as pin holes and end fittings, are especially prone to wear from repeated use on rental units. Remove the bar from service immediately if any structural defect is found.
How Do You Verify the Working Load Limit on a Rental Unit?
The working load limit on a rental unit must be permanently marked on the bar itself and match the requirements of your lift plan. Under OSHA 29 CFR 1926.251, custom-designed lifting accessories must be marked to indicate safe working loads and proof-tested to 125% of their rated load prior to use. If the WLL marking is missing, illegible, or inconsistent with rental documentation, do not use the bar. According to ASME B30.20, the bar must also display the manufacturer’s name and serial number alongside the rated load capacity.
What Should You Look for in the Attachment Points and Hardware?
The attachment points and hardware to inspect include shackle pins, end clevises, bail connections, and any adjustable collar assemblies. Look for elongated pin holes, cracked welds at the bail, bent or deformed shackle bows, and missing or damaged cotter pins. Threaded components should turn freely without resistance, and no connection point should show signs of metal fatigue or impact damage. Hardware issues at attachment points are among the most common failure origins on rental equipment that has cycled through multiple jobs.
How Do You Confirm the Rental Unit Meets OSHA Rigging Standards?
A rental unit meets OSHA rigging standards when it has been inspected by a competent person before each shift and carries current documentation of periodic inspection. Under OSHA 29 CFR 1926.251, rigging equipment for material handling shall be inspected prior to use on each shift, and defective equipment shall be removed from service. Request the rental unit’s inspection records from the supplier before accepting delivery. A reputable rental provider should supply documentation confirming annual periodic inspection under ASME B30.20 requirements. Tway Lifting provides professional rigging inspection services with detailed reporting performed by certified specialists, making it straightforward to obtain the documentation ASME B30.20 requires before a lift begins.
How Do You Calculate the Right Spreader Bar Length for Your Lift?
Calculating the right spreader bar length requires matching the bar’s span to your load dimensions while maintaining safe sling angles. The sections below cover sling angle physics, load-dimension matching, and the consequences of using a bar that is too short or too long.
How Does Sling Angle Affect Spreader Bar Load Distribution?
Sling angle affects spreader bar load distribution by changing the tension each sling must carry relative to the actual load weight. As the angle from horizontal decreases, sling tension rises significantly, reducing effective capacity.
According to ANSI/ASME B30.9 data cited by ScienceDirect, a sling at 30° carries 1.732 times the tension of the same sling rigged at 60°, meaning the 60° configuration effectively provides 73% more usable capacity. OSHA recommends a minimum horizontal sling angle of 60° as best practice, and prohibits angles below 30° entirely.
Bar length directly controls these angles: a longer bar spreads attachment points wider, pushing slings closer to vertical and reducing tension. Selecting bar length with sling angle in mind is one of the most impactful decisions in lift planning.
How Do You Match Bar Length to the Dimensions of Your Load?
Matching bar length to load dimensions starts with measuring the load’s attachment point spread and working backward to the sling angles those dimensions will produce at your available lifting height.
The key steps are:
- Measure the load’s lift point span: Identify where slings or shackles will attach along the load’s length or width.
- Calculate available headroom: Determine the vertical distance from the crane hook to the top of the load.
- Select bar length to achieve 60° or greater sling angle: Bar length should be at least as wide as the load’s attachment point spread, with longer bars preferred when headroom is limited.
- Verify the bar’s rated capacity covers the load weight at the chosen sling angle: Sling tension increases at shallower angles, so capacity must be rechecked against the actual rigging geometry.
What Happens If You Use a Spreader Bar That Is Too Short or Too Long?
Using a spreader bar that is too short or too long creates distinct but equally serious risks.
A bar that is too short forces slings into steep inward angles, dramatically increasing tension and potentially exceeding both the sling’s and the bar’s rated capacity. A bar that is too long creates outward sling angles that can push end forces away from the bar’s designed compression axis, introducing bending loads the bar was not engineered to handle.
The consequences of either mismatch include:
- Overloaded slings that fail under tension above their working load limit.
- Uncontrolled load tipping if attachment geometry shifts the center of gravity.
- Bar structural failure if bending or off-axis compression exceeds design limits.
Selecting a bar length matched precisely to load geometry, with sling angles verified at 60° or above, eliminates both failure modes before the lift begins. Tway Lifting’s rental inventory includes spreader beams from 2 to 100 tons and up to 40 feet in length, offering a range of bar sizes to match the geometry requirements of most industrial lifts.
How Do You Rig a Spreader Bar Correctly for a Safe Lift?
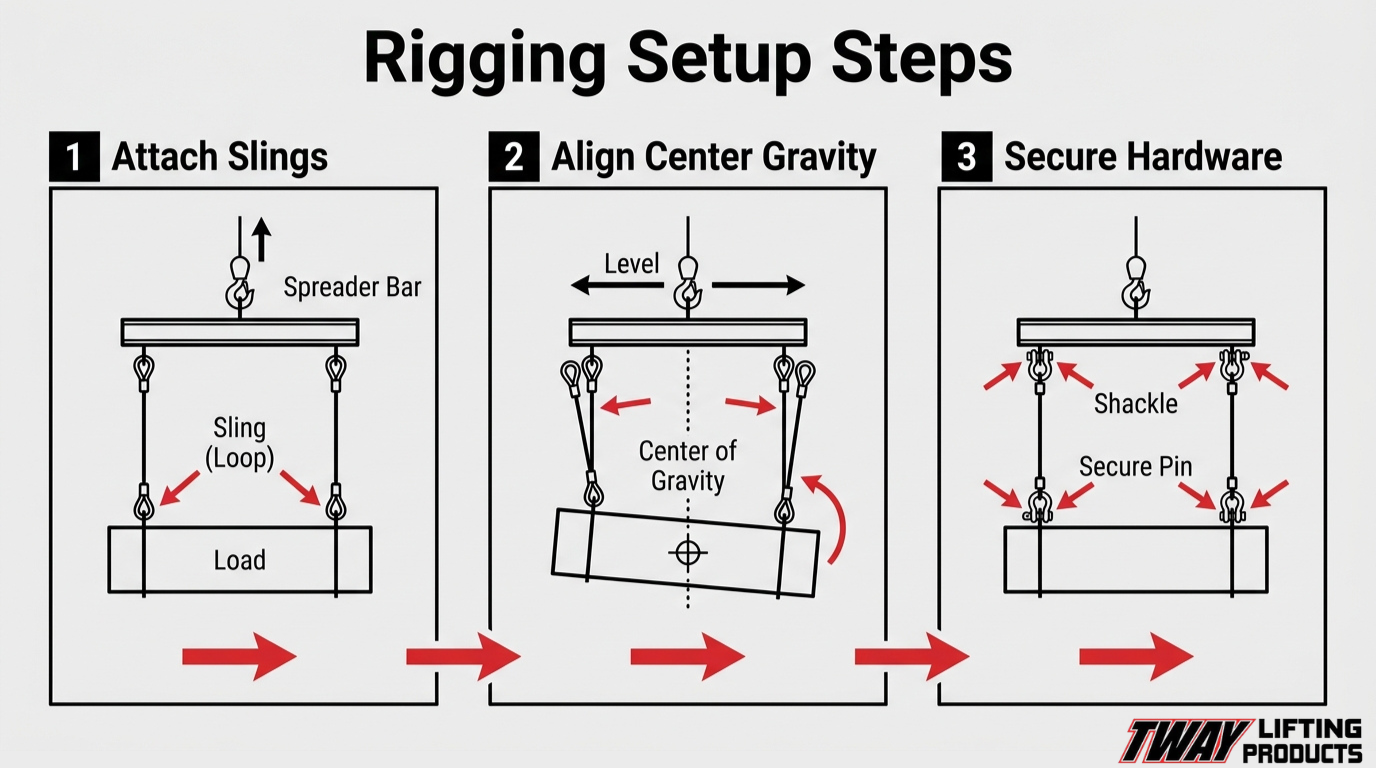
Rigging a spreader bar correctly requires proper sling attachment, precise center-of-gravity alignment, and fully secured end fittings before any load leaves the ground. The three H3s below cover each step in sequence.
How Do You Attach Slings to a Spreader Bar Without Creating Shock Load?
Attaching slings to a spreader bar without creating shock load requires pre-tensioning each sling gradually rather than allowing sudden load transfer. A spreader bar is a load-attaching device, classified as a below-the-hook lifting device under ASME B30.20, which means every attached sling and fastening carries compressive force into the bar during the lift.
To prevent shock load, follow these steps:
- Position all slings before signaling the hoist to take weight.
- Take up slack slowly, confirming each leg is evenly tensioned before the load breaks ground.
- Inspect every sling and fastening for damage prior to use. Per OSHA 29 CFR 1910.184, slings and all fastenings shall be inspected each day by a competent person before use, and damaged slings must be removed from service immediately.
- Never jerk or surge the hoist during initial load pickup.
Rushed pickups are among the most preventable causes of rigging failure — slow, controlled tension buildup protects both the slings and the bar. Tway Lifting supplies wire rope slings, synthetic slings, shackles, and hoists alongside spreader beam rentals, allowing crews to source compatible rigging components from a single provider and reduce the risk of mismatched hardware.
How Do You Position the Spreader Bar Relative to the Load’s Center of Gravity?
Positioning the spreader bar relative to the load’s center of gravity requires the bar’s attachment points to align directly above the load’s calculated center of gravity. If the bar is offset, the load will tilt, shift sling loads unevenly, and risk an uncontrolled swing.
To determine correct positioning:
- Calculate the dead weight of each load component using drawings or a calibrated measuring device, ensuring drawings reflect the current configuration.
- If measured weight is unavailable, apply a contingency factor: 5% for solid items, 15% or more for vessels or items with voids that may contain liquid.
- Apply the resulting design weight as the not-to-exceed value when setting the bar’s pickup points.
- Confirm both attachment points are equidistant from the center of gravity before the lift.
Off-center positioning is a subtle but serious error; even a modest CG offset creates a dynamic imbalance that worsens once the load swings freely.
How Do You Secure Shackles and End Fittings Before the Lift Begins?
Securing shackles and end fittings before the lift begins means verifying that every pin is fully seated, moused or safety-wired, and that all hardware carries the correct rated capacity for the lift. According to OSHA standard interpretations, each custom-designed lifting accessory must be proof-tested and marked before being deployed for use.
For each end fitting:
- Confirm the shackle pin is threaded fully home and the nut is secured with a mousing wire or safety pin.
- Verify the shackle’s working load limit matches or exceeds the calculated leg load.
- Check that no shackle is side-loaded; the pin must bear load along its intended axis.
- Confirm the spreader bar’s end fittings show no visible deformation, cracks, or wear before connection.
With all end fittings confirmed, the rigging assembly is ready for a controlled trial lift.
What Are the Step-by-Step Procedures for Setting Up a Spreader Bar?
The step-by-step procedures for setting up a spreader bar cover three critical operational phases: conducting a trial lift, establishing lift signals, and adjusting for load shift during the active lift.
How Do You Conduct a Trial Lift Before Full Load Commitment?
A trial lift involves raising the load a few inches off the ground and pausing to observe balance, sling tension, and hardware behavior before proceeding. Verify that the spreader bar is visibly marked with load ratings and safety warnings before the test begins. According to an OSHA citation, a spreader bar that lacked readable product safety labels and load markings created recognized hazards likely to cause death or serious physical harm. Never commit to a full lift on an unmarked or unlabeled bar. If the load tilts, settles unevenly, or any rigging component shows unexpected movement during the trial, lower the load and re-rig before continuing.
How Do You Communicate Lift Signals When Using a Spreader Bar?
Lift signal communication requires the person directing the lift, the crane operator, and the appointed signalperson to agree on all signals before operations begin. Per the National Commission for the Certification of Crane Operators, voice signals must be discussed and agreed upon by all three parties prior to any lifting operation. If communication is disrupted at any point, the crane operator must stop all movements immediately until contact is restored. Standard hand signals should also be posted conspicuously on-site as a backup reference.
How Do You Adjust for Load Shift During an Active Lift?
Adjusting for load shift requires stopping the lift, lowering the load safely, and re-rigging before resuming. Never attempt to correct a shifting load while it remains suspended. A competent person, per OSHA 29 CFR 1926.1412, must conduct a visual inspection of equipment prior to each shift and continue monitoring during use. Watch for uneven sling tension, bar rotation, or changes in load angle as early indicators of center-of-gravity displacement.
With trial lift, signal protocols, and load shift response procedures in place, the setup sequence gives operators the structure to catch hazards before they escalate.
What Are the Most Common Spreader Bar Setup Mistakes to Avoid?
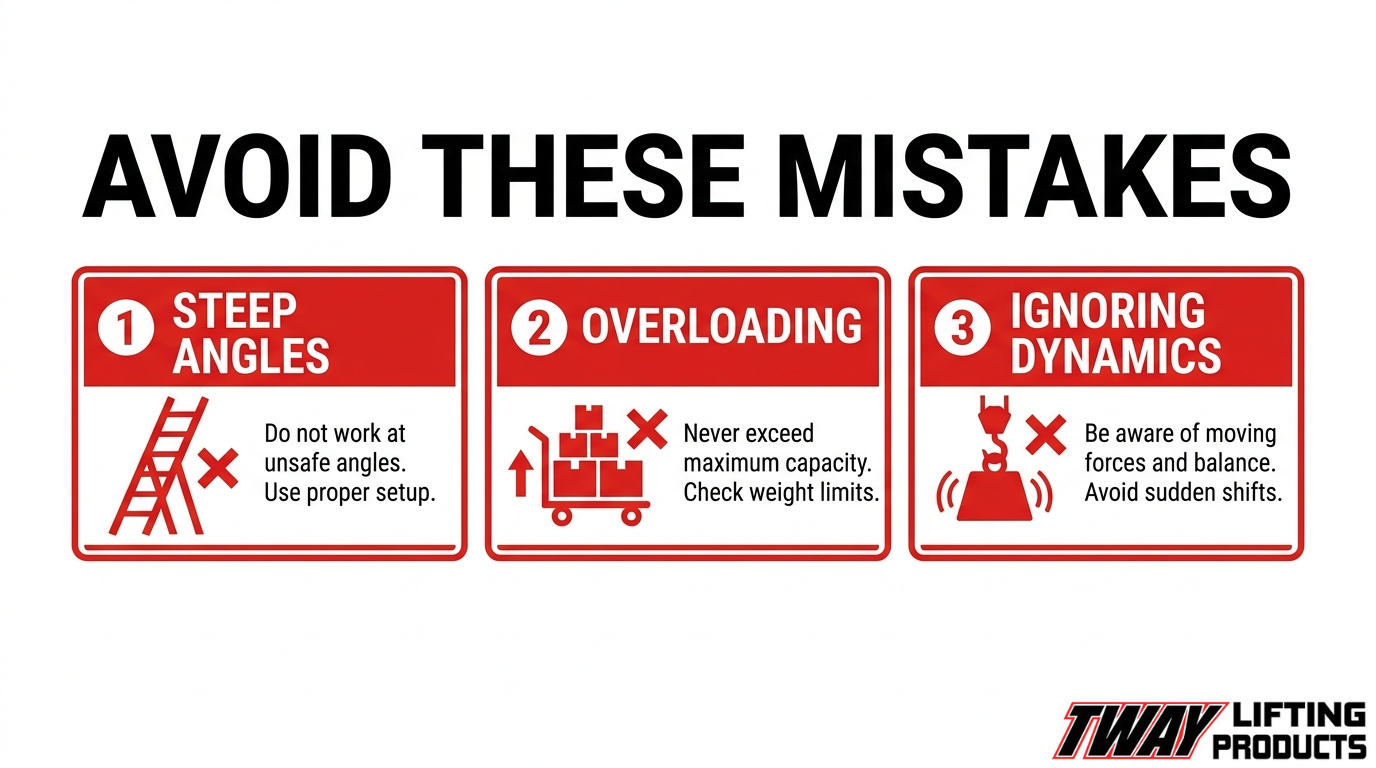
The most common spreader bar setup mistakes include using incorrect sling angles, overloading the bar beyond its rated capacity, and ignoring the bar’s dynamic load rating. Each mistake introduces a distinct failure pathway that can result in serious injury or a dropped load.
What Happens When Sling Angles Are Too Steep on a Spreader Bar?
Sling angles that are too steep on a spreader bar significantly reduce effective lifting capacity and increase compressive forces on the bar itself. OSHA explicitly prohibits slings with horizontal angles below 30 degrees, and best practice calls for 60 degrees or greater. At 30 degrees, sling tension is 1.732 times higher than at 60 degrees, according to ANSI/ASME B30.9 data published by ScienceDirect. Steep angles also cause inward horizontal forces that overload the bar’s end fittings. Riggers often underestimate this force multiplication, which makes sling angle one of the most consequential and underappreciated setup variables on any lift.
How Does Overloading a Rented Spreader Bar Create Failure Risk?
Overloading a rented spreader bar creates failure risk by applying forces beyond the bar’s verified working load limit, compromising structural integrity without visible warning. An OSHA-cited accident report documents a spreader bar and pipe dislodging from a lift truck and striking a worker, causing severe head trauma. Overloading is especially dangerous with rental equipment because operators may be unfamiliar with the bar’s rated capacity or assume additional margin exists. Never exceed the marked WLL, and always factor in rigging weight and dynamic conditions before committing to a lift.
Why Is Ignoring the Bar’s Dynamic Load Rating Dangerous?
Ignoring the bar’s dynamic load rating is dangerous because real lifts generate forces well beyond static weight due to acceleration, swing, and sudden load shifts. According to Holloway Houston Inc., spreader bars are designed with a minimum safety factor of 3, specifically to account for dynamic movement and unexpected loading conditions. ASME BTH-1 further distinguishes Design Category A (predictable loads) from Design Category B (unpredictable or severe conditions), requiring higher design factors for dynamic environments. Treating a dynamic lift as a purely static event eliminates that engineered safety margin entirely, leaving no buffer against failure.
What OSHA and ASME Standards Apply to Spreader Bar Use?
The OSHA and ASME standards that apply to spreader bar use are drawn from multiple regulatory volumes covering construction, inspection, marking, and operation of below-the-hook lifting devices. The key standards are OSHA 29 CFR 1926.251, ASME B30.5, and ASME B30.20.
How Does ASME B30.20 Govern Below-the-Hook Lifting Devices Like Spreader Bars?
ASME B30.20 governs below-the-hook lifting devices by establishing provisions for marking, construction, installation, inspection, testing, maintenance, and operation of devices used to attach loads to a hoist. Spreader bars fall directly under this standard’s scope. According to ASME B30.20, spreader bars must be clearly marked with their rated load capacity, manufacturer’s name, and serial number. Any rental unit missing this marking is non-compliant before the lift even begins. This marking requirement is one of the most commonly cited violations in OSHA inspection records, making it a non-negotiable compliance checkpoint.
How Does ASME B30.5 Apply to Crane Operations Involving Spreader Bars?
ASME B30.5 applies to crane operations involving spreader bars by governing the construction, inspection, testing, maintenance, and operation of mobile and locomotive cranes used to execute those lifts. When a spreader bar is suspended from a mobile crane, B30.5 controls the crane side of the operation, while B30.20 governs the bar itself. Both standards must be satisfied simultaneously for a compliant lift. Treating them as separate checklists rather than an integrated compliance framework is a mistake that increases incident risk.
What Do OSHA Regulations Require for Spreader Bar Marking and Proof Testing?
OSHA regulations require that spreader bars, as custom-designed lifting accessories, be marked with their safe working load and formally proof-tested before use. Under 29 CFR 1926.251, custom lifting accessories must be proof-tested to 125% of their rated load and show zero permanent deformation to pass. This proof-test requirement applies to rented equipment as well, meaning renters should confirm documentation exists before deploying any spreader bar on site.
When Should You Stop a Lift and Re-Rig a Spreader Bar?
You should stop a lift and re-rig a spreader bar any time the load shifts unexpectedly, a sling slips at an attachment point, visible bar deflection occurs, or communication with the crane operator breaks down. The H3 below covers the specific re-rigging triggers that cause the most serious injuries.
What Are the Warning Signs That Require Immediate Re-Rigging?
The warning signs that require immediate re-rigging include visible load tilt, sling slippage at the bar’s end fittings, audible stress sounds from the bar, and any unplanned movement during the pick. A foreman documented in an OSHA accident report lost four toes after signaling the crane operator to lower hoist units while his foot rested on a magnet the spreader bar supported, not realizing the bar would descend with the hoists. The job safety analysis had explicitly warned of this injury type, yet the plant safety rules were not followed. Any time crew members are within the load’s fall zone during rigging, stop immediately, clear personnel, and reassess attachment points before continuing.
How Do Tway Lifting’s Rental and Inspection Services Support Safe Spreader Bar Setups?
Tway Lifting’s rental and inspection services support safe spreader bar setups by providing rigging equipment for rent, certified inspection specialists, and a rental inventory that includes spreader beams ranging from 2 to 100 tons.The sections below cover inspection eligibility for rented bars and key safety takeaways.
Can Tway Lifting’s OSHA-Compliant Inspections Be Used for Rented Spreader Bars?
Yes, Tway Lifting offers professional rigging inspection services that can be applied to rented spreader bars. OSHA 29 CFR 1926.1412 requires a competent person to begin a visual inspection prior to each shift the equipment will be used. Tway Lifting’s certified inspection specialists perform detailed inspections for both owned and rented rigging, with documented reporting as part of the service
ASME B30.20 governs below-the-hook lifting devices, covering marking, construction, installation, inspection, testing, maintenance, and operation.
For any rental project, pairing equipment pickup with a pre-use inspection is the most practical way to eliminate compliance gaps on site.
What Are the Key Takeaways About How to Set Up Your Rented Spreader Bar Safely?
The key takeaways about how to set up your rented spreader bar safely are built around three priorities: verified equipment, correct geometry, and clear communication.
- Inspect before every shift. Confirm load markings, check attachment hardware, and remove any defective component from service immediately.
- Verify the WLL against actual load weight. Never estimate; use calibrated load data and apply appropriate contingency factors.
- Maintain sling angles at 60 degrees or greater. Shallower angles multiply sling tension and reduce effective capacity.
- Align the bar with the load’s center of gravity. An off-center connection causes tipping and uneven force distribution.
- Agree on lift signals before operations begin. All parties, including the crane operator and signalperson, must confirm communication protocols in advance.
- Use Tway Lifting’s rental and inspection services together. Renting certified, properly marked equipment and scheduling a pre-use inspection removes the most common compliance risks in a single step.
Tway Lifting has manufactured, sold, and rented rigging equipment since 1945, giving customers access to spreader beams ranging from 2 to 100 tons, up to 40 feet in length, alongside certified inspection expertise.